Managing the full YouTube content lifecycle — from idea to publishing — is repetitive and time-consuming. To address this, I built an automated pipeline that generates scripts, creates audio and visuals, merges audio and video with FFmpeg, and uploads the final video to YouTube. The workflow integrates custom voice generation, image creation, a custom merging tool, and automated upload.
This workflow was developed using n8n, a powerful no/low-code automation tool, together with external APIs such as OpenAI, ElevenLabs, and Runway ML. Below, I’ll walk you through the pipeline step by step.
Tech Stack Used
OpenAI API → Generates script, title, and description
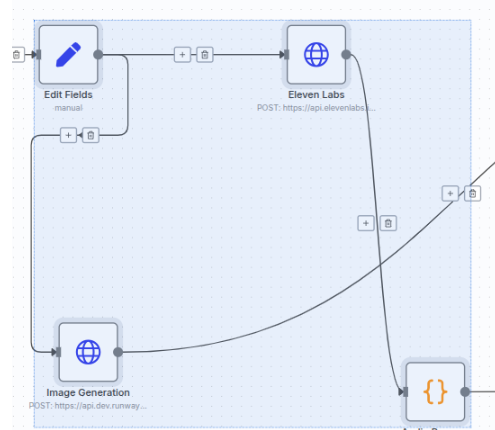
ElevenLabs API → Creates the voice-over
Runway ML API → Generates images and videos
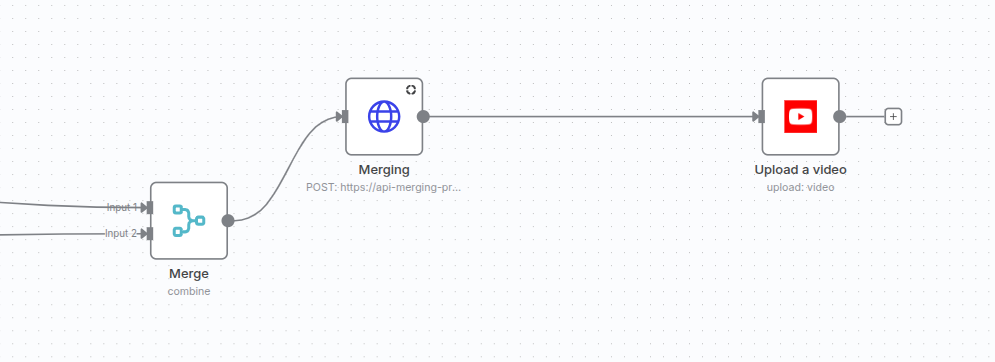
Custom API (Node.js + FFmpeg) → Merges audio and video
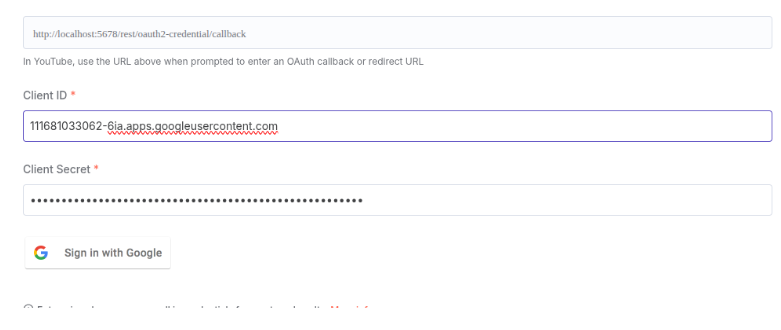
YouTube API → Uploads the final video
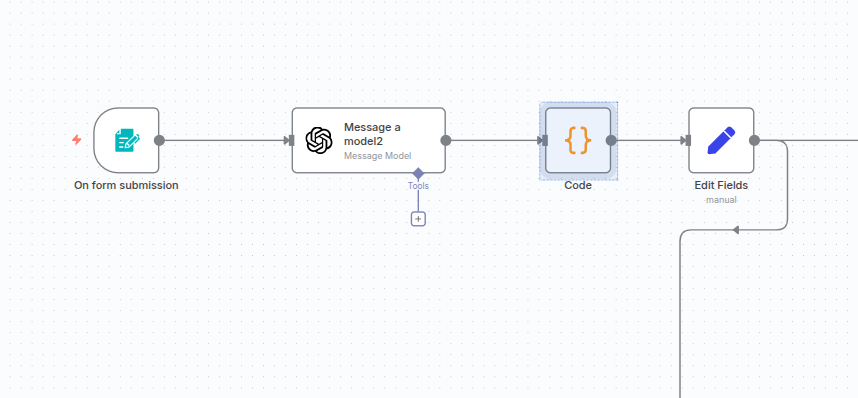
Step 1: User Input
The workflow begins with an n8n Form Trigger, where the user describes the idea and sets requirements for the video.
For example: “What is Agentic AI? Duration: 10 seconds.”
Prompt Example: Describe the process of Robotic Process Automation. Duration should be 10 seconds. Upload it to YouTube.
Step 2: Script Generation
The user’s input is passed to OpenAI, which generates a complete video script based on the provided idea. The input includes the concept, desired duration, and target platform. The OpenAI API then returns a title, script, and other metadata.
API Key Setup:
Instead of hardcoding API keys in nodes, place them in a .env
file so the workflow can securely access them.
Create a
.env
file and store all keys there.In the OpenAI API Node, go to Credentials, set the Key Name as
Authorization
, and its value as{{$env.YOUR_KEY_NAME_IN_.ENV}}
.Ensure the key name matches exactly between the expression and the
.env
file.
Step 3: Data Structuring
A Code Node parses the JSON response returned by OpenAI:
let content = items[0].json.message.content;
if (typeof content === 'string') {
// 1. Remove Markdown code fences
content = content.replace(/(?:json)?\s*([\s\S]*?)\s*/i, '$1');
// 2. Remove leading/trailing whitespace and \n, \r
content = content.trim().replace(/^\\n|\\n$/g, '');
try {
// 3. Parse the JSON
content = JSON.parse(content);
} catch (err) {
return [{
json: {
raw: items[0].json.message.content,
cleaned: content,
error: 'Failed to parse JSON: ' + err.message
}
}];
}
}
This node (“Code Node”) parses the JSON returned by the OpenAI API Node.
Next, a Set Node extracts key values such as script text, title, video duration, and target platform.
At this stage, the workflow branches into two paths: one for audio generation and another for visual generation.

Step 4: Audio Generation
The script is sent to ElevenLabs, which generates a natural-sounding voice narration for the video.
For this workflow, we use:
model_id =
eleven_monolingual_v1
stability =
0.5
Explanation of fields:
model_id → Specifies which ElevenLabs model to use for generating the voice.
stability → Controls how consistent the output is. Lower values allow more emotional variation, while higher values produce more stable results.
script → The actual text content that will be converted into the voiceover.

After setting the parameters, the script is passed to the ElevenLabs node as input for voiceover generation.
Expression for API Key:
{{$env.YOUR_API_KEY_IN_.ENV_FILES}}
(Replace YOUR_API_KEY_IN_.ENV_FILES with the actual key name stored in your .env file.)
Step 5: Image and Video Generation
A Runway ML Node generates an image based on the video title.
A Wait Node (30–40 seconds) ensures the image is fully processed before moving forward.
The generated image is then passed into another Runway ML Node to produce the video.
A final Wait Node holds the workflow until the completed video is returned.

Step 6: Preparing for Merge
A Merge Node collects both outputs — the audio from ElevenLabs and the video from Runway ML — into a single workflow branch.
⚠️ Important: Since this process uses a custom API for merging, you must first deploy the API. After deployment, copy its URL and paste it into the merging node inside n8n. (No authorization is required for this step.)
Step 7: Merging with Custom API
Instead of merging directly inside n8n, an HTTP Node sends both the audio and video files to a custom Node.js API.
This API, built with FFmpeg, merges the files into a single final video.
The merged video is then returned to the workflow.
Fields explanation:
Audio field → Requires the audio file. When enabling Send Body, select Form-Data and choose the n8n binary files.
Video field → Requires the video file. The file names must be audio and video, as expected by the API. If the names don’t match, merging will fail.
This approach provides greater flexibility and efficiency for handling media processing. (Backend code is available in the repository.)

Step 8: Uploading to YouTube
The finished video is passed to the YouTube Node, which uploads it directly to the channel — without manual intervention.
⚠️ Note: To enable uploading, you need a Google Cloud Console project with a client ID and secret key. After linking your Google account and YouTube channel, n8n can upload the video automatically.

Deployment
Remember: to enable uploading, you must connect your YouTube account within n8n.
You can deploy this workflow on any hosting service or run it directly on n8n.cloud for quick setup and scalability.
Custom Merging API
If you plan to use the custom merging API, you’ll first need to deploy it on your preferred hosting platform. This is necessary due to HTTPS requirements and certain n8n configuration limits.
Both the API backend code and the n8n template are available in our repository:
GitHub – GPT-Laboratory / social-media-automationTo use the Node.js code in a cloud environment, simply update the API endpoint in your n8n HTTP Request node, and the workflow will handle merging automatically.
Notes & Future Improvements
Current Limitation: Due to API constraints, the workflow currently uses a single image as the frame to generate a 10-second video.
Upcoming Update: A new version with improved video generation features will be released soon. You can also view demo videos included with the repository.